Entering Your First Plan

Contents
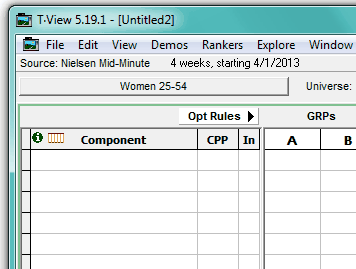
Now that you have started a plansheet, chosen a database, and defined your demo target, you're ready to enter a television plan.
Choosing Media Vehicles
We'll make a list of dayparts we're considering in the space under the "Component" heading:
Click on any row under "Component", and you'll see a popup menu of choices available for the database you are using:
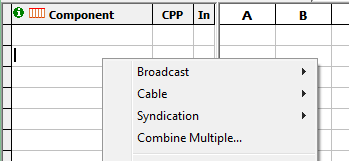
In this example, choices are grouped under three major headings, Broadcast, Cable and Syndication. Those lead to submenus of related choices. For example, Broadcast might open to a set of broadcast network dayparts, and some of then may have their own submenus:
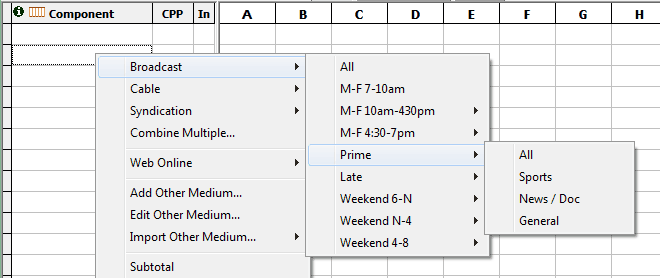
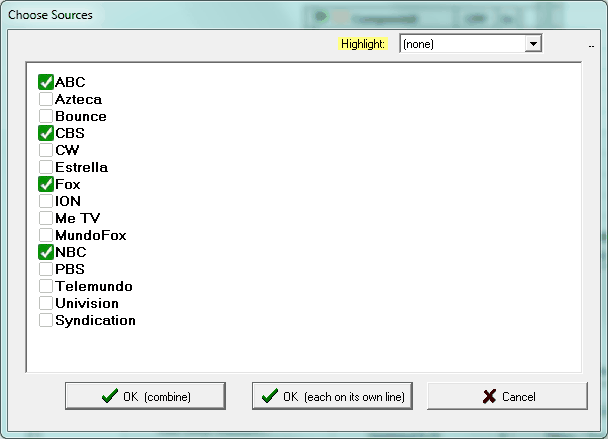
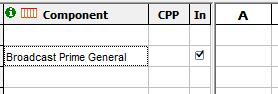
For now, choose one of the major dayparts, such as Prime > General (in this example). TView then asks you what networks should be included for the daypart you have chosen. Pick a few likely ones:
TView puts the chosen daypart onto your plansheet:
Now add a few more dayparts in the same way: For each, click on any row under the "Component" heading, choose a daypart from the popup menu, and then pick some networks from the dialog that follows. Your choices might then look like this:
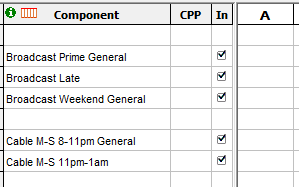
(Since we are free to add lines to any row, we chose to put a space between the broadcast lines and the cable lines.)
Plan Columns
A media plan is specified by entering GRPs into a plan column. The plan columns are headed by letters of the alphabet, "A", "B", and so on:

You might use these plan columns to show:
| • | Alternative plan ideas |
| • | Parts of plan analyzed separately |
| • | Steps in the development and refinement of a plan |
| • | How the plan is constructed in different months or quarters or other time periods |
Entering GRPs
Now we're ready to enter plan specs into the plansheet. The main grid of the TView plansheet works something like a spreadsheet. You can move between cells with the arrow keys, click on a cell to move immediately, and type in entries directly into cells.
GRPs are entered by simply typing them into the plansheet. You can erase an entry by moving to the plansheet cell, and pressing the backspace key on your keyboard. Try typing in some numbers under the "A" heading for each of the dayparts you've specified:

As you typed, the cells in column A shaded in yellow, letting you know that you are entering GRPs into a newly active plan.
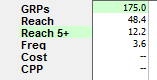
Looking at the Results
Also as you typed, results started appearing at the bottom of the plansheet, showing the total of the GRPs you've entered, but also an estimate of the reach and frequency that this plan will produce:
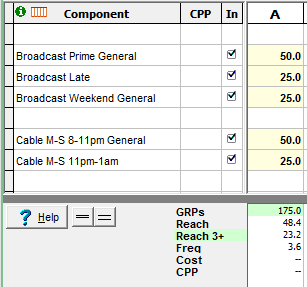
Congratulations: you've specified a television plan and produced a reach and frequency estimate!
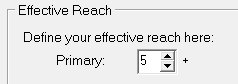
Setting Effective Reach
In the example shown above, and possibly on your first plan on your computer, you may notice that the results include an estimate for an effective reach level, Reach 3+. To change this, click on the "Settings" tab at the bottom of the plansheet:
![]()
On that tab, you can set the definition of effective reach to be whatever you like:
Then click on the "Table" tab on the bottom of the plansheet:
![]()
The bottom line results will have changed to show your corrected setting for Effective Reach:
MUCH More About Your Plan
So now you know the reach, ER and frequency of your plan.
Here's how to get much more! Just click anywhere in the results box on the bottom of a plan column (except in the green areas for GRPs and Cost!)
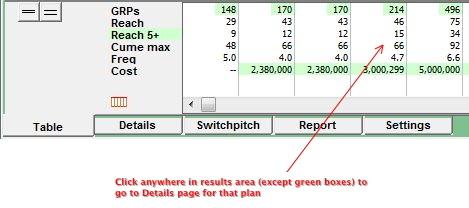
That will take you to the Details tab for extensive information about the performance of your plan. Have a jolly time exploring, and click the Table tab to get back to your plan columns.