Switchpitch™: Exploring Alternatives

Contents
Optimization is more like a mesa than a mountain: you have lots of flexibility once you’ve reached the range of “optimum” performance. TView's Switchpitch™ helps planners intelligently explore that wide area.
TView provides a tool we call Switchpitch™ to generate and explore many plan alternatives all at once. While Optimize constructs a brand new plan, Switchpitch looks at many variations applied to an existing plan.
Optimize |
||
Consider many alternative options |
|
Find one really good plan!
– balance: appealing CPM, preserve inventory – promote your reach ability – give preference to your faves
|
Switchpitch |
||
One “good” plan
|
|
Give me a whole bunch of good alternatives!
|
To create a Switchpitch report, first create a plan as usual. Make sure that any daypart or other media component to be considered has some GRP entry, even "0". That is how Switchpitch will know what items are to be included in the analysis.
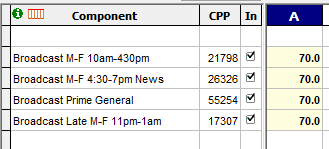
Next, select the plan heading. In this example, plan A has been selected, and there are four television components to be considered:
Next, choose "Switchpitch" on the Explore menu. (You can quickly reach this command with a right-click on the plan column header. For example, point to the letter "A" at the top of the first plan column and click the right mouse button.)
A dialog allows you to set how the analysis is to be performed:
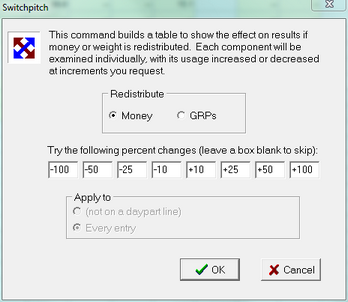
The radio button choice lets you choose whether to redistribute points or dollars. If you choose "GRPs", then all plan alternatives will have the same total GRPs as the original plan. If you choose "Money", then all plan alternatives will have the same total cost as the original plan. In most cases, you will want to choose "Money", since the goal usually is to adjust a plan while observing the same budget. (If cost information has not been entered, then the "Money" choice is greyed-out.)
The eight entry boxes let you specify increments for tweaking the line items in the plan. For example, if one of the entries is "+25", then TView will examine what happens if it boosts the usage of a plan component by 25%, and it will do that for each of the plan components. Alternatives are attempted for every one of the specified percentages (unless the entry box is blank or zero). Up to eight percentage levels can be entered in one use of the Switchpitch command.
When you click OK, TView creates a Switchpitch report (on the "Switchpitch" tab). The effect of tweaking each plan component is shown individually. The specified percentage adjustments are applied to the plan component, and the remaining plan components are proportionately scaled in the other direction.
The total number of plan alternatives generated by Switchpitch is equal to the number of plan components used, times the number of percentage values to apply. In our example, a plan that has four components, a Switchpitch with eight percentage values will create and evaluate 32 new plan alternatives!
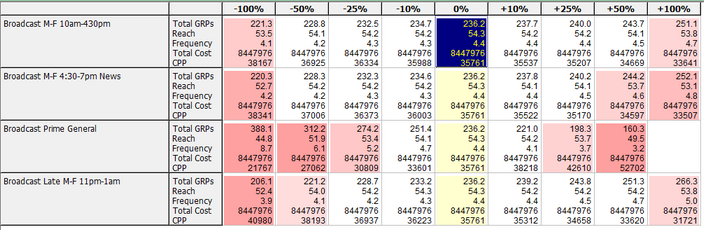
Switchpitch results are presented in an interactive grid, which lets you probe further and further into possible plan alternatives. Running the small example shown above produces this:
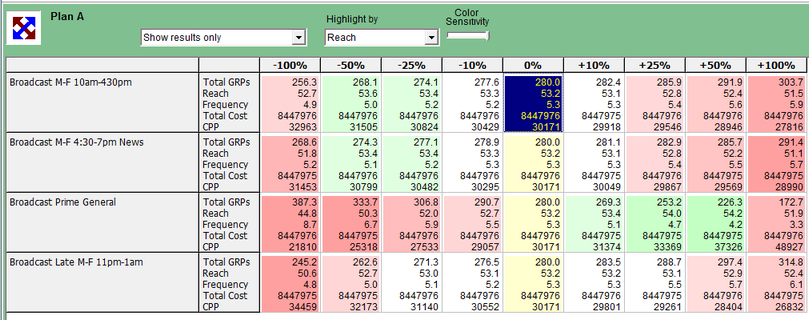
The yellow column down the center shows the original plan, with 0% changes. Note that the values in the cells in that column are all the same.
Each row of this grid shows what happens when we change advertising levels for one of the vehicles in the original plan. Each column in the grid shows a different percentage.
In the illustration above, the first row reports on what happens when we try varying the weight on network daytime (labelled here as "Broadcast M-F 10am-430pm"). The first column of results, headed with "-100%", shows what happens if we eliminate daytime from the plan and redeploy the money proportionately to the other dayparts. We learn that doing that will reduce the reach by a half-point, from 53.2 to 52.7. The next column shows the next change, cutting a placement in half ("-50%"). If we cut daytime in half, we actually improve the reach by almost a half-point, from 53.2 to 53.6. TView's Switchpitch tool is giving us a strong suggestion that it might be a good idea to reduce daytime, but to not remove it entirely!
Looking around the table, the most dramatic effects involve the third row, prime time. We see that boosting prime by 50% adds a full point of reach. This is the case even though buying prime (which is more expensive) means that we'll have a reduced GRP total. But it's worth it if reach is our main goal.
Color Codes
As you probably guessed, the cells are tinted to helpfully suggest the results. Use this control to decide whether the color coding should be based on reach results or effective reach results:
![]()
Cells reporting a reduced reach (or ER) are shown in shades of red, while cells with green tints highlight plans with improved reach. The darker the color, the greater the change: consider those cells in richer green colors!
You can change how sensitive the color coding is to reach changes, using this control:

What To Show
A popup menu at the upper left lets you decide how much detail should be shown in the grid.
This gives you a choice between full information, and brevity:
![]()
Keep the Good Ones!
As you perform a Switchpitch, you may identify several plan alternatives that have some promise.
To keep the "good ones", click on the desired cell, and then click the "Keep" button:
![]()
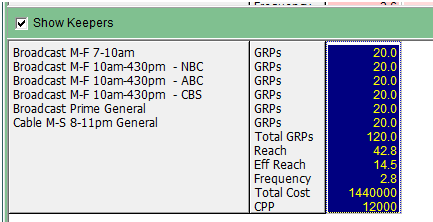
The chosen plan will be added to the "Keepers" list at the bottom:
You can remove a plan from the "keepers" list using the "Remove" button.
These plans are "kept" while you are on the Switchpitch tab. However, this list may be cleared at certain times while you work on the main "Table" tab. To "keep" plans for a longer time, use the "Replace" or "Create New" buttons.
Do It Again (Switchpitch This)
![]()
Once you spot an improved plan, then the next most common question is, "Well, what happens if I explore options on this plan?" To do that, click on the cell of interest, and then click on "Switchpitch This". A new Switchpitch is performed, generating lots of new plans, all based on variations of the revised plan!
Replace the Original Plan
![]()
Ultimately, you may decide that a plan you have just discovered really is better (for you and your
goals, that is) than was the original plan. To replace the original plan completely, click on the
cell of interest in order to select it, and then click "Replace Plan". When you return to the Table
tab, you will see that the original plan has been replaced by this new allocation.
Create New Plan
![]()
Instead of replacing the original plan, you may wish instead to keep that original plan but also
add a new plan. Click on the grid with the new plan you like, then click on "Create New Plan".
When you return to the Table tab, you will see that a new plan column has been added. Of course,
you could add several new plan columns in this way.
Switchpitch Text Report
Results from every Switchpitch are also provided in a text form on the "Reports" tab. The Switchpitch text report can be saved or printed, or you can edit, copy or paste the text that it contains.
Switchpitch and Optimization
A special case happens if you run Switchpitch on a plan that has already been optimized:
If a plan has been optimized with a goal of reach, then no changes at all are likely to have any good effect upon reach. That's why the above example shows only reddish-tinted cells and no green. But in this case the white cells are very interesting and useful to us! Those cells vividly illustrate the Media Mesa, where you are free to make changes without disturbing R&F results. Dig into that by reading about the Media Mesa!